How to Draw Mountains
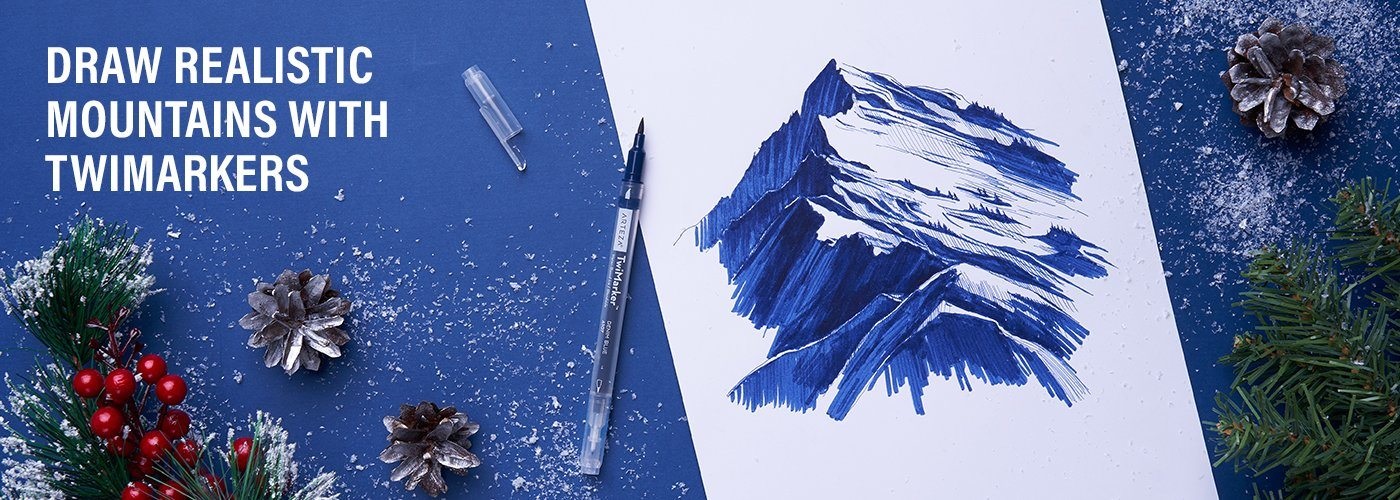
Table of Contents:
Make a Majestic Mountain Drawing
Who doesn’t get inspired when looking at the awesome majesty of a mountain range? Artists for centuries have been struggling with how to draw mountains. And although mountains may be an intimidating subject, especially if you’re a beginning artist, they are something that can be mastered with practice. I’ve put together this step-by-step guide to learn how to draw a mountain in hopes it will give you a foundation to take your mountain drawing to new heights.
List of Supplies
- HB Pencil
- Arteza Sketch TwiMarker Blue in A107 Denim
- Watercolor Pad, 32 Sheets, 9x12"
6 Easy Steps
The mountain range in this guide is done using a monochromatic scheme, meaning only one color is used. In this case, I used Arteza’s Denim Blue A107 TwiMarker. By using one of these art markers, I had an added benefit of a fine tip on one end that she used for small details and a wider tip on the opposite end for filling in broader areas. Made with water-based ink, these markers also make blending colors easier, which is an important part of this exercise.
Step 1. Draw an outline
First, determine where the tops will be placed on your paper. You can place them high or low, depending on how much sky there will be.
TIP: A standard rule of composition is to avoid placing your focal point, in this case, the mountains, across the page’s center. Positioning them off-center will make your drawing more unexpected and interesting.
Make a sketch of the mountain’s general form. Create a faint line by applying just a little pressure on the pencil. This line should be somewhat wavy to resemble various mountain heights as well as differentiate which side will be in shadow. Begin sketching your largest peak first, which is located in the distance. Decrease each one’s size as they get closer to the viewer.

Step 2. Darken the outline
Using TwiMarker’s fine tip, I created a line of consistent width to go over my initial lines. Next, I erased all visible pencil marks.

Step 3. Add the initial shadows
What will make your range look realistic is the placement and tones of your shadows. Determine which side is receiving the most light. In this demonstration, I decided that the right side would be illuminated; therefore, the mountain’s left side would be in shadow.
As you progress through your drawing, use three tones for shadows: a light tone, a mid-tone (or halftone), and a dark tone. To achieve this, start by giving all areas that are in shadow an even layer of color using the marker’s wide tip. Be careful not to go over your previous marks, as layering at this stage will eliminate the light tones later on.

Step 4. Create the mid-tone shadows through hatching
Now, add the mid-tone shadows to define the illuminated side. For this, I used TwiMarker’s smaller tip. To make halftones, a technique known as “hatching” is used. Hatching is the placement of thin lines horizontally, vertically, or diagonally very close together. The closer these lines are placed to one another, the darker an area will appear. You may do your hatches in one or two directions. Hatching partially covers the paper’s surface and looks like a shadow of one mountain sitting in front of another. This adds some diversity to the painting to make it more interesting. Learn more about using markers for hatching by reading our blog, “Fun & Easy Marker Drawing Techniques.”

Step 5. Make the darkest shadows by layering
This stage is where I layer and blend to make the darkest shadows. This contrast is important to really define the ragged edges of the ridgeline and give the true feeling of light shining on it.
TIP: It is important to pay special attention to the ridgeline where the light and shadow meet. This is where the highest amount of contrast will be, resulting in being where the viewer’s eye is drawn first.
To make the darkest contrast, use the hatching method and make multiple layers with the TwiMarker.

Step 6. Add finishing touches
Once again, employ the fine tip end of the marker to draw tiny trees on the illuminated side. Also, add some jagged random lines to further enhance the rugged territory of the mountainside.

Recommendations
- To see how real mountains are arranged in the landscape and to get an idea of how you want yours to be, look at images in magazines and books and on the internet.
- Don’t rush through your initial drawing. The more specifics you put in during the beginning, the more authentic your drawing will appear, as well as help you correctly place your shadows.
- Take advantage of TwiMarker’s dual tips. The fine tip will give you the ability to create thin lines and place the smallest particulars, such as tiny trees, with ease, while the broader tip will help you add large areas of even color without fear of overlapping or having lines in an area that should be one solid, smooth color.
Congratulations! You’ve drawn a beautiful and realistic mountain range. We hope this guide will help you confidently add more mountains to your artwork, and inspire you to try new tools, such as ArtBeek TwiMarkers.